Making lab
by Murasaki
2021/08/26 07:00
パーソナル・ファブリケーションCNCツイートシェア▼ZOOM conferences have increased due to Corona.Sometimes I see cats from another house over the screen, and every time I see a cat, I say "cute ~".Not only on the meeting but also on Twitter, I often see cats falling at my desk and disturbing my work.To be honest, enviable.I also want to love cats during remote work!I want to be disturbed by a cat sleeping on the keyboard!But I can't keep a cat!So, I would like to make a "cat -type keyboard" that will take place on the desk instead.There are some that I want to use the recently purchased machines as the motivation behind the scenes because it looks like a future and cool.
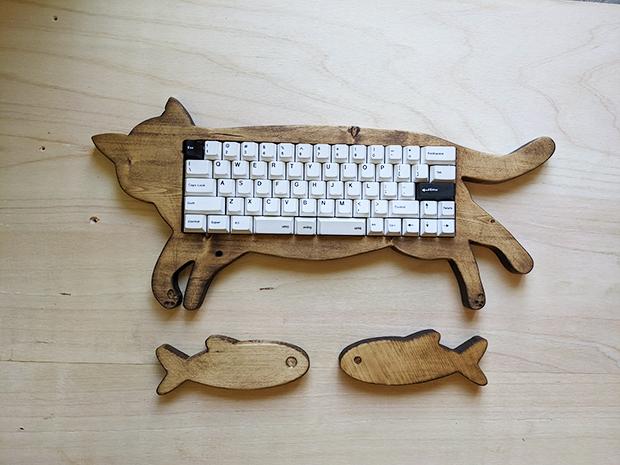
Cat -type keyboard = cat -shaped keyboard case
Make a cat -shaped keyboard case and a fish -shaped palm rest.The keyboard body will be used to cut the wood to make a case using a commercially available board for custom keyboards.
Future machine!Use handheld CNC using AR
作り始める前に、切削に使う機械shaper originの紹介を!(ステマではなく私が個人的に購入して気に入ったので勝手に広報です)。
Basically, it is a CNC, but it is characterized by moving the body.Put the tape with AR marker on the material to recognize it.When the processing data is read, the cut line is displayed on the display.If you move the main unit by hand along the line, the machine will automatically correct it, so you can process according to the data.It can handle thicker and larger materials than laser processing machines, and have the advantage that the body is smaller than large CNCs like SHOPBOT.It has not been released in Japan yet and was ordered from the United States.Note that the technical conformity certificate (technical correspondence) required to use devices with wireless communication functions in Japan has not been acquired, and in this production, we have notified the special system.By the way, if you use a USB memory, you can use it without communication.
Make a fish -shaped palm rest
First of all, I will make a palm rest for machine practice.
Paste the plate material on the plate with a powerful double -sided tape and attach the attached marker tape.Paste in parallel at intervals of about 7 cm.I added it because it was not enough in the image state.This marker links the virtual work space with the physical work space.As a result, the position of the main unit can be accurately grasped, so it is a mechanism that allows you to cut it without shift from the data.Also, it was very good to use it when I stopped working on the way and resumed.When the machine was cleared up and the work was restarted the next day, it was very convenient to be able to continue just by reading the marker without having to re -match the position.

Shaper Origin is like this.While looking at the display on the front, move it with the steering steering wheel that protrudes left and right.
If you loosen the stopper, the router part can be removed.
Attach the bit.This rotates at high speed and cuts the tree.Three drills, thin drills, and V -bit (images).It is used properly depending on the fineness of the processing.
Return the router part and turn on the main body to recognize the marker tape.It is recognized as reflecting the marker on the body camera and is reflected on the display.Move the body to recognize all markers.
Read the data.There are two ways to use USB memory and how to load files uploaded on the cloud.Move the body while looking at the screen and place it in the position you want to cut.
Enter the depth of cutting and the type of bit to use and measure the distance to the board material to complete.Turn on the router and move the main unit to the cut position to display the dotted line.Press the CUT button (green button in the photo) and move the body to trace the dotted line.
When the cutting is over, remove it from the discarded board.It's cut beautifully.The thickness of this board was about 2㎝.Take the burrs, put the sewage, and put the rubber foot on the back side to complete.
Create a keyboard case by sharpening it
We will make the keyboard case body with fullness.First, cut the entire area where the keyboard is stored in a thick bit.First, dig into the whole, then scrape the part other than the mountain that stops the screw.It was quite difficult to cut on one side.The cut -cuts are in the way, and the marker is not recognized, and the first step and the second cut have shifted or distorted.
Change the bit to a narrow one and cut the outer shape.The thickness of the board material is 2cm.In order to reduce the burden, the cut depth was divided into two stages, and two laps were cut.
If you remove it from the abandoned board, a cat is born!
Take the burrs and lightly adjust the surface with a file.Finish by applying oil for wood.Apply, wipe, dry, apply again, and dry to dry.
Actually, I broke the screw hole after this.If you make a hole with a drill to prepare an insert nut, it will be cricked.I should have used a slightly harder tree or put an insert nut before cutting.This time, I will give up and stop the board directly with a tree screw.
Assembly of keyboard
It is finally assembly.Parts and materials are
- ケース
- スタビライザー
- キースイッチ
- キーキャップ
- フォーム
- 基板(DZ60+Mill-Maxソケット)
- プレート
- USB Type-Cケーブル
And the M2 tree screw.
The stabilizer is a part for pushing a long key cap straight.Put it into the board.
Put the plate on and turn on the switch.This board, DZ60, requires soldering.However, the Mill-Max socket, the switch, was put in advance, so this time I just insert it without a solder.
Spread the form on the case.
Put the board with the switch in the previous switch.
Thrain in the hole of the board and put the key cap on it to complete.
I put a key cap of the cat's palm for finishing.It feels good with the feel of the pink part.
Healed with a cat -shaped keyboard
Immediately go to the cat keyboard to the desk.It's good except to take the place of the desk in large and wastefully.It is a very good feeling of use as a keyboard with a soft keyboard feeling.
Also, when I see a cat from another house at a ZOOM meeting, I can afford to say, "I have a cat too," and even if there is an irritable event, a paw key cap.If you do Punipuni, you will be frustrated.How about a cat -type keyboard for a house where a cat can't keep it?

![EVsmart blog Toyota's electric car "bZ4X" that makes you feel comfortable with electric cars and quick chargers / No% display of battery level [Editorial department] Popular articles Recent posts Category](https://website-google-hk.oss-cn-hongkong.aliyuncs.com/drawing/article_results_9/2022/3/9/752542064665dc2bd7addbc87a655694_0.jpeg)
![Lenovo's 8.8 inch one-handed tab "Legion Y700" full specs released! [Is the price in the 40,000 yen range?]](https://website-google-hk.oss-cn-hongkong.aliyuncs.com/drawing/article_results_9/2022/3/9/207e1be231154e91f34c85b4b1d2126c_0.jpeg)

