New OS "Windows 10" that is particular about usability on PC
On July 29, 2015, Microsoft's new OS "Windows 10" was released to the public. Devices with Windows 7 / 8.1 can be upgraded to Windows 10 for free for one year after the release, and the migration of individual users is progressing at a faster pace than the past Windows. For corporate users who place more importance on stability than innovation, it is expected that the transition to Windows 10 will gradually progress, targeting the end of support for Windows 7 in 2020.
The major change in using Windows 10 on laptops and desktop PCs is the "restoration of the desktop UI (user interface)". The "Start Menu" before Windows 7, which was omitted in Windows 8 / 8.1 and was controversial, has been completely revived, a tiled Modern UI has been integrated into it, and a virtual desktop function that enhances multitasking workability. The desktop UI of the PC has evolved to be easier to use.
Of course, Windows 10 that is particular about the desktop UI has also modified the setting of the display that displays it, and the operation of "multi-display" (connecting multiple displays to one PC and using them at the same time) There are also some ideas to improve the sex. This time, let's take a look at Windows 10's multi-display utilization techniques that are not yet surprisingly known on both laptop and desktop PCs.
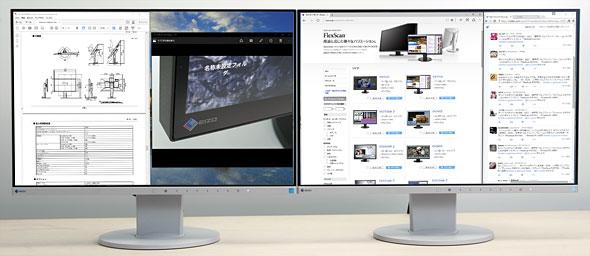
An example of connecting EIZO's liquid crystal display "FlexScan EV2455" to a 13.3-inch 2in1 notebook PC (VAIO Z). By adding a large 24.1-inch WUXGA (1920 x 1200 pixels) external display to the 13.3-inch laptop built-in display, you can connect two FlexScan EV2455 to your desktop PC to greatly improve the listability and work efficiency. Expanded display example. Two 24.1-inch WUXGA (1920 x 1200 pixels) screens are lined up side by side to achieve a high resolution of 3840 x 1200 pixels on a large horizontally long screen.Greatly improves work efficiency when opening multiple windowsUnderstand Windows 10 display settings
Setting up a multi-display environment on Windows 10 is easy. When you connect a second display to your PC, Windows will automatically detect that display and display the desktop UI.

At this time, the display method of the desktop UI can be selected from the "View" menu of the OS. You can call up the "View" menu by launching "Action Center" from the taskbar and selecting "View", or by using the "Windows" + "P" shortcut key. The following four display methods can be selected. Select "Extend" if you want to expand the desktop UI over two screens.
Call "Action Center" from the icon at the bottom right of the taskbar and click "View" (image = left). In the "View" menu, you can select from four types of display methods when connecting to multiple displays (image = right).To customize the expanded screen in more detail, select "Display Settings" from the menu displayed by right-clicking on the desktop UI, and launch the "Display" menu in "System".
From here, you can set the positional relationship between the two screens, the display size (magnification) of text, the display orientation, the above four display methods, and the main / sub display. Also, if you don't see the connected display, you can often find it by clicking Detect (if you can't find it, we recommend reconnecting the cable or restarting your PC).
The squares "1" and "2" displayed in the gray box indicate the positional relationship between the two displays. It's a good idea to drag and move "1" and "2" to make fine adjustments so that they fit the position where the display is actually placed.
Recently, the number of notebook PCs equipped with high-definition displays with extremely high pixel densities that greatly exceed full HD is increasing, but when an external display is connected to such products, characters are displayed on the internal display of the notebook PC and the external display. And the display size of the icon is greatly different, and it may be difficult to work. In such a case, it is also effective to drag the slider bar of "Resize text, apps, and other items" to bring the display size closer.
Right-click the desktop UI and select "Display Settings" from the displayed menu . In the "Display" menu of "System", the positional relationship between the two screens, the display size (magnification), the display orientation, and the multi-display display method. , Main / sub display can be setScroll down the System Display menu to the Advanced Display Settings link, which you can click to set the display resolution. You can also click the "Resize text and other items" link to resize each item in more detail and set a custom enlargement ratio. You may want to adjust the size to make it easier to see according to the pixel density, viewing distance, and eyesight of the display.
In the "Detailed display settings" menu, you can set the resolution of the display.As mentioned above, Windows 10 has a new "Settings" app, which is usually recommended, but there is also a "Control Panel" for Windows 8.1 and earlier. If you are familiar with PCs, you can set various display settings at once from the same control panel as before.
Windows 10 makes window placement easier
In Windows 10, the snap function that snaps the window to the edge of the screen is also available on multiple displays, making it more convenient. If you drag a window to the left and right edges of the screen, the window will be displayed in the left and right halves of the screen without any gaps, and even in the extended desktop display, it can be snapped to each screen edge. The same operation can be performed with the shortcut key of "Windows" + "←" or "→".
Also, when the window is attached to one of the left and right sides with the snap function, the other open windows are displayed as a thumbnail list in the empty area on the opposite side, and you can select the window to be attached to the other screen edge. This is also a new feature from Windows 10.
In Windows 10, when the snap function is used to attach windows to the left and right edges, other open windows are now listed as thumbnails in the empty area on the opposite side.From here, you can specify any window and make it stick to the empty area without any gaps.In Windows 10, if you move the window to the four corners of the screen, you can also attach the window to the four corners in 1/4 size. If you have too many windows and the desktop UI is cluttered in a multi-display environment, you can quickly wiggle the windows to shake them to minimize all other windows ("Windows" +). The same applies to "Home").
If you use the half-screen size and 1/4 size snap function, you can spread windows without gaps like this and use it without waste.Taskbar settings to make multi-display easier to use
I also want to set the taskbar to improve the usability of multiple displays. Select "Properties" from the menu displayed by right-clicking the taskbar to display "Taskbar and Start Menu Properties", and set from "Multiple displays". If you want the taskbar to appear on the second display as well, check "Show taskbar on all displays".
.. Select "Properties" from the menu displayed by right-clicking on the taskbar (image = left). You can select how to display the taskbar when using multiple displays from "Multiple displays" in "Taskbar and Start Menu Properties".The icon display on the taskbar can be selected from three types according to your preference. "All taskbars" displays the icons of the functions running in full screen in the same way on the taskbar of each screen. If you select "Main taskbar and taskbar of open window", all icons will be displayed on the first screen, and only the icons of the functions running on that screen will be displayed on the second screen. When you select "Taskbar of open window", the icon of the function used on each screen is displayed individually. You can also choose whether to combine the buttons on the taskbar.
From the top, the difference in display in each setting of "All taskbar", "Main taskbar and taskbar of open window", and "Taskbar of open window". Windows 10 standard voice-enabled personal assistant "Cortana" and notification area that displays time and icons, let's make full use of multi-display with Windows 10 that is displayed only on the main display 1 | 2 Go to the next page
![Lenovo's 8.8 inch one-handed tab "Legion Y700" full specs released! [Is the price in the 40,000 yen range?]](https://website-google-hk.oss-cn-hongkong.aliyuncs.com/drawing/article_results_9/2022/3/9/207e1be231154e91f34c85b4b1d2126c_0.jpeg)
![EVsmart blog Toyota's electric car "bZ4X" that makes you feel comfortable with electric cars and quick chargers / No% display of battery level [Editorial department] Popular articles Recent posts Category](https://website-google-hk.oss-cn-hongkong.aliyuncs.com/drawing/article_results_9/2022/3/9/752542064665dc2bd7addbc87a655694_0.jpeg)

